

Fresh basil and mint are easy to grow hydroponically, even for beginners. Systems like basil, mint, and chives are forgiving and grow quickly with just water and nutrients. If you can fill a jar, you can grow herbs.
Forget the guesswork of soil, this method gives plants exactly what they need. Ready to start? Keep reading for the simple steps.
Quick Picks for Beginner Hydroponic Herbs
- Start with basil, mint, or chives; they grow quickly and handle beginner errors well.
- Use a simple Kratky or Deep Water Culture (DWC) system to learn the basics without pumps or complexity.
- Keep your nutrient solution’s pH between 5.5 and 6.5 for healthy, fast-growing plants.
What Makes a Herb “Easy” for Hydroponics?
Easy hydroponic herbs have a simple goal: make leaves, not fruit or complex flowers. That takes less energy from the plant, and less precision from you. They grow fast, which means you see progress quickly, a real morale booster.
They tolerate a range of conditions. A pH around 5.5 to 6.5 is generally suitable for many hydroponic herbs.
According to Journal of Horticulture
“An optimal growing medium or solution should ideally maintain “a low soluble salt content and a pH between 5.0 and 6.5” to ensure robust nutrient uptake.” – Journal of Horticulture
They also recover well from a rough harvest. Snip them back, and they bounce bushier.
In water culture, you eliminate the friction of soil. Because the root system doesn’t have to push through dense dirt to seek out water or minerals, the plant redirects all of its metabolic energy upward.
For a leafy herb, this constant, unrestricted nutrient delivery translates directly into rapid leaf production and shorter harvest intervals.
You don’t need intense light or perfect climate control. I recommend hanging a basic, full-spectrum 24-watt LED grow light roughly 6 to 8 inches directly above your plants.
Run it on a simple plug-in timer for 14 hours a day to simulate peak summer sun, ensuring tight node spacing and thick, flavorful leaf clusters. The system does the heavy lifting of delivery. You just manage the buffet line.
Your First Tier: The No-Fail Hydroponic Herbs

These are the ones you start with when you need a win. They’re reliable, they’re productive, and they won’t make you feel like you’re failing.
Basil: The Unbeatable Champion
If hydroponic herbs had a valedictorian, it would be basil. Genovese basil, in particular. It germinates in just a few days under warmth. Its growth is almost visible, a lush, leafy sprawl that begs to be pruned.
You pinch off the top set of leaves, and two new branches take its place. It’s a positive feedback loop of greenery. I’ve neglected a basil plant, let the water get low, only to see it perk right up after a refill. It wants to live.
It thrives in almost any simple system. A Kratky jar, a DWC bucket, it doesn’t seem to care. It’s hungry for light, though. Give it 14-16 hours under a decent LED or full sun, and it will repay you tenfold. The scent when you brush against it, that’s the real reward. It smells like success.
Mint: The Vigorous Volunteer
Mint is the friendly bulldozer of the herb world. Once it starts, it doesn’t stop. Spearmint or peppermint, it’s all the same relentless green energy. This vigor is its gift to the beginner.
Over-fertilize a bit? It’ll probably use the extra. Under-light it slightly? It might get leggy but it won’t die. Its roots are thick, white, and aggressive, quickly filling any reservoir you give it.
That’s the only caveat, really. That wonderful vigor makes mint a bad roommate for slower herbs. Plant it in a shared container with parsley or cilantro, and within weeks the mint roots will have claimed every inch of space.
It’s best practice to give mint its own dedicated home. A single mason jar on the windowsill, set up with the Kratky method, is a perfect mint factory. It’s almost too easy.
Chives: The Steady, Unassuming Producer
Chives don’t have the flashy growth of basil or the wild sprawl of mint. They are the quiet, dependable backbone. You plant them, they form a neat clump of hollow green tubes, and then they just provide.
Snip what you need for an omelet, and they send up more. They’re incredibly compact, making them perfect for small countertop gardens or windowsills where space is tight.
They’re also remarkably tolerant. They tolerate small pH swings better than more sensitive crops, they aren’t heavy feeders, and they handle cooler temperatures better than basil.
The Royal Horticultural Society lists them as one of the most adaptable kitchen herbs, and that holds true in water culture. They’re the herb you forget about until you need them, and they’re always there.
The Second Wave: Easy After a Careful Start
These herbs are perfectly easy to grow hydroponically, but they have one little quirk at the very beginning. Get past that hurdle, and they’re just as dependable as the first tier.
| Herb | The Initial Hurdle | The Growth Pattern & Care | The Harvest Mindset |
| Parsley | Germination is famously slow, often taking 2-3 weeks. The wait feels like a test. | Once it sprouts, it establishes strong roots and becomes a steady, low-maintenance producer. Keep the medium moist with gentle warmth during germination, then mostly leave it be. | This isn’t about quick cuts. It’s about having a constant, reliable source of fresh parsley for months. |
| Cilantro | The seed is a two-part husk. If not prepared, water can’t penetrate and germination is unreliable. | Gently crush the husk or soak seeds overnight for reliable sprouting in 7-10 days. It bolts in heat, so keep it cool and avoid intense light. Harvest outer leaves often. | It needs a different approach. Frequent, light harvesting delays bolting and extends its productive life. |
| Dill | It doesn’t have a major initial hurdle, but you need to plan for its final size. | It grows tall and feathery, surprisingly fast. Be ready to give it more vertical space or lower the light to prevent it from getting leggy. | It’s a classic “cut-and-come-again” herb. Just remember its height when planning your setup. |
| Oregano | It starts slow, putting energy into building tough roots and woody stems first. | Once established, it’s a prolific, spreading grower that tolerates some neglect. Letting the water level drop slightly between top-ups can actually help. | This herb rewards a little benign neglect. It’s tough and produces abundantly once it gets going. |
The table below breaks down four common hydroponic herbs that are easy to grow but have a specific initial quirk. For each herb, it outlines the main challenge at the start, how it grows and what it needs for care, and the right mindset for harvesting it successfully.
Choosing Your Simple Starter System
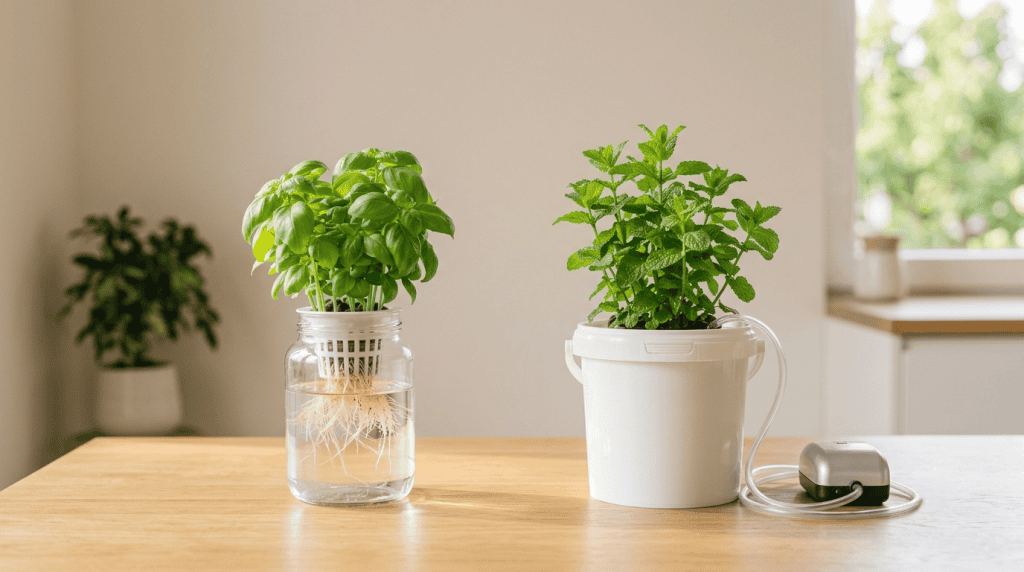
You don’t need a laboratory. For herbs, two simple methods stand out for their low barrier to entry: the Kratky method and Deep Water Culture (DWC). The choice depends on how hands-off you want to be.
The Kratky method is completely passive. You anchor your seedling into a net cup using clay pebbles, suspend it over a mason jar filled with nutrient solution, and let biology do the work.
The real trick is the air gap: as the plant drinks, the water level drops, forcing the upper root zone to develop specialized ‘air roots’ that pull in oxygen. Never top the water all the way back up to the rim, or you will drown those air roots and kill the plant; only refill the jar halfway.
Deep Water Culture is its slightly more involved sibling. The plant’s roots are suspended in a constantly aerated nutrient solution. An air pump and air stone bubble oxygen into the water, creating an incredibly rich environment for root growth. It requires a pump, but that’s it.
Plants in DWC often grow faster than in Kratky because the roots have unlimited access to both water and oxygen. It’s ideal for a small tote or bucket where you might grow a few plants together.
The Beginner’s Guide to Hydroponic Herb Care
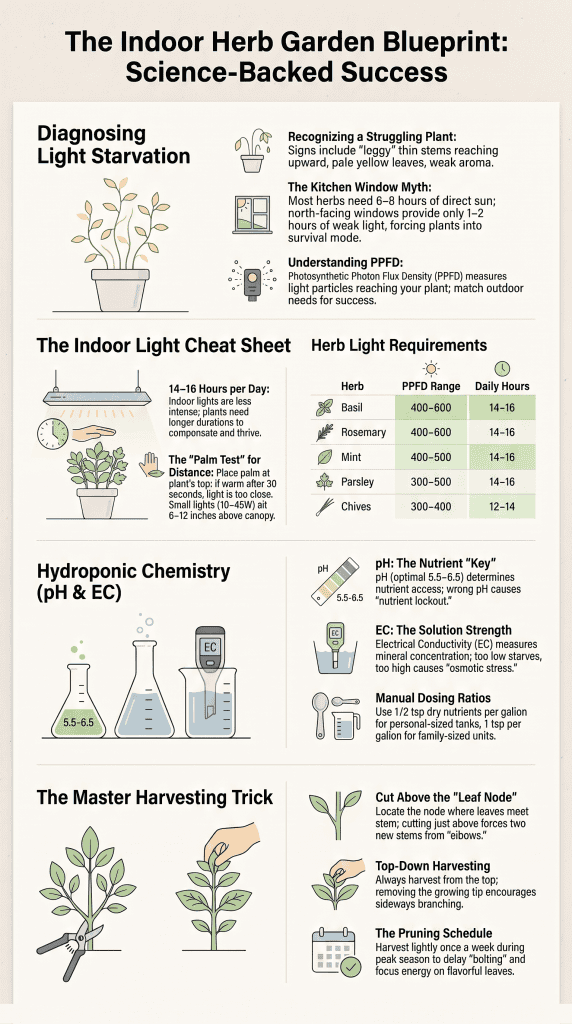
It boils down to three things: food, environment, and harvesting. When picking your nutrients, bypass the formulas meant for tomatoes or flowers. Since we only care about leaf production, look for a liquid concentrate with a high-nitrogen N-P-K ratio, like a 3-1-4.
I always mix my initial reservoir at an Electrical Conductivity (EC) of 0.8 for young seedlings to avoid burning the tender roots, gradually bumping the concentration up to an EC of 1.6 as the root mass fills out.
When it comes to environment, herbs are energy hogs. A standard windowsill rarely cuts it in the winter, leaving your basil spindly and reaching.
pH is the silent variable. It controls how well your plants can absorb those nutrients. You need a cheap pH test kit or digital meter. Aim to keep your solution between 5.5 and 6.5. Check it weekly. If it drifts, a few drops of pH up or down solution will correct it. It sounds fussy, but it becomes a 30-second ritual.
Harvesting is where you interact. Always use clean scissors. For basil, mint, and oregano, snip just above a set of leaves (a node). This encourages bushy side growth. For “cut-and-come-again” herbs like cilantro, parsley, and dill, harvest the older, outer leaves first, letting the younger center leaves continue growing.
For chives, simply snip what you need from the top. Frequent, gentle harvesting is better than one massive chop.
Herbs to Avoid (Until You’re Confident)
Some herbs are technically possible but can test a beginner’s patience. Woody, Mediterranean herbs like rosemary, sage, and thyme are the main ones. They grow slowly in hydroponics.
Their woody stems and smaller leaves mean they don’t produce the rapid, leafy growth that feels rewarding. They often prefer a drier root zone, which is the opposite of what hydroponics provides.
According to ALTO Garden
“Unlike leafy greens that thrive in constant dampness, these species require specific dry intervals to prevent root suffocation and disease, as “they prefer the soil [or media] to dry out between waterings” to prevent severe issues like root rot.” – ALTO Garden
They can be grown, sure. But they require more precise control over nutrients (often a weaker solution) and more patience. You’ll wait weeks to see noticeable growth. It’s better to build confidence and a sense of rhythm with the fast-growing leafy herbs first. Come back to rosemary when you’re bored of how easy everything else is.
Common Pitfalls and How to Sidestep Them

Credits: Humble Growth
Most problems are easy to diagnose. Don’t panic if your lower, older leaves start losing their vibrant green hue. If your pH is sitting perfectly at 6.0, this yellowing is a clear sign that your hungry herbs have exhausted the nitrogen supply in the reservoir.
Instead of dumping arbitrary amounts of fertilizer into the existing water, completely flush out the old, depleted solution and mix a fresh batch at full strength. Spindly, stretched-out plants are begging for more light. Move them closer to the source or get a stronger grow light.
Root rot is a classic hydroponic issue. It looks like brown, slimy roots and smells bad. It’s usually caused by insufficient oxygen in the water (a failing air pump in DWC) or water that’s too warm.
Keep your reservoir cool and shaded, and ensure good aeration. If you see green slime coating your rockwool or floating in your water, light is leaking into your system and fueling algae growth.
Algae will quickly steal the nitrogen meant for your herbs. To stop this before it starts, wrap your glass mason jars in black electrical tape or thick aluminum foil, and cut out a small cardboard collar to place over the top of your net cups to completely block out the light.
The biggest mistake is overcomplication. Starting with too many herbs, in a system that’s too complex, with nutrients you don’t understand. Start with one basil plant in a Kratky jar. Master that. Then add a mint. Then try a DWC bucket with parsley and chives. Let your confidence grow with your plants.
Your First Hydroponic Herb Setup: A Shopping List
A very simple setup can be inexpensive, especially if you already have a light and basic supplies from the store. Here’s what you actually need:
- Container: A clean, opaque container sized to the plant and root mass, such as a mason jar for a single herb. or a 3-5 gallon bucket with a lid (for DWC).
- Net Cups: 2-inch or 3-inch plastic pots with slotted sides.
- Growing Medium: Rockwool cubes or clay pebbles (Hydroton) to support the seedling.
- Nutrients: A small bottle of general-purpose, liquid hydroponic nutrient (like General Hydroponics Flora series or Masterblend).
- pH Kit: A simple pH test kit and small bottles of pH Up and pH Down.
- Seeds: A packet of Genovese basil.
- Light: A sunny south-facing window OR a basic, full-spectrum LED grow light bulb in a desk lamp.
- For DWC Only: A small air pump, airline tubing, and an air stone.
That’s it. No fancy controllers, no complex plumbing. Assemble it, mix nutrients to the bottle’s instructions, adjust the pH, plant your sprouted seed, and watch.
From First Sprout to Kitchen Harvest
The journey from a tiny seedling to your first harvest is a short one with these herbs. In a warm room around 72°F (22°C) with solid lighting, you will be pinching off your first structural basil yields in exactly 28 days.
That rapid feedback loop is why I always steer beginners toward leafy water-culture; you can visually see the direct impact of your ambient room temperature and light placement on a weekly basis. The feedback loop is quick. You see the cause and effect of your care almost immediately.
You learn to read the plants. The vibrant green of health, the slight pale tinge that asks for food, the upward reach for light. It stops being gardening and starts being a partnership.
You provide the stable foundation, the water, the food, the light. They do the rest, transforming those simple inputs into flavor, aroma, and a deep, quiet sense of accomplishment. It’s not just about having herbs. It’s about understanding a small, complete system you built yourself.
FAQ
If I get a root rot flare-up, is the harvest still safe to eat?
Yes, as long as the leaves themselves look healthy, crisp, and smell right.
If you catch brown, slimy roots early, snip away the dead mush, flush your reservoir with fresh water, and add a splash of 3% hydrogen peroxide (about 1-2 teaspoons per gallon) to re-oxygenate the water and kill off the remaining pathogens before it reaches the stems.
These beginner hydroponic herbs grow reliably indoors, making them an excellent starting point for anyone interested in hydroponic gardening for beginners.
Which hydroponic herbs require the least maintenance indoors?
For a completely hands-off kitchen setup, stick to chives and oregano. Unlike finicky Mediterranean varieties like rosemary or thyme, which I’ve watched rot overnight because their roots suffocated in constant water,chives and oregano are incredibly forgiving of minor pH shifts and don’t require complex wet-dry cycles to stay vibrant.
These indoor hydroponic herbs also fit nicely in a compact hydroponic garden, making them practical choices for busy households and small living spaces.
Which hydroponic system is easiest for growing herbs at home?
The Kratky method is usually the easiest option because it has a simple design and requires very little equipment. Many herbs for Kratky method grow successfully with this approach. As you gain experience, you can also try DWC herbs or NFT herbs.
Choose a hydroponic herb system that matches your available space, budget, and maintenance preferences.
How can I keep hydroponic herbs producing fresh leaves after every harvest?
Harvest herbs regularly, but never remove too much growth at one time. Proper pruning hydroponic herbs, using balanced hydroponic herb nutrients, maintaining the correct hydroponic pH for herbs, and replacing the nutrient solution for herbs on schedule all support healthy growth.
Many herbs that regrow after harvest will continue producing fresh leaves for a continuous herb harvest.
Which herbs grow the fastest in a small indoor hydroponic garden?
If you want quick results, choose fast growing hydroponic herbs such as hydroponic basil, hydroponic dill, hydroponic cilantro, and hydroponic parsley.
These are among the easiest herbs to grow hydroponically because they establish quickly under good growing conditions. They also perform well as countertop hydroponic herbs, making them ideal for a beginner indoor herb garden with limited space.
Your Path to a Constant Herb Supply
Fresh herbs are always better when they’re within reach, and growing them yourself is much easier than it seems. Start with easy hydroponic herbs like basil, mint, or chives, and you’ll build confidence with every harvest. That’s what makes the difference.
When you’re ready to grow more, just add another jar or try a new herb. If you want a simple way to get started, Tophydroponicgarden can help make the process easier. You don’t need a perfect setup, you just need to begin, and before long you’ll have a steady supply of fresh herbs right at home.
References
- https://horticulturejournal.usamv.ro/pdf/2024/issue_2/Art49.pdf
- https://altogarden.com/blog/how-to-grow-rosemary-indoors/
Related Articles
- https://tophydroponicgarden.com/guide-to-hydroponic-herb-gardening/
- https://tophydroponicgarden.com/how-to-build-a-simple-hydroponic-setup/
- https://tophydroponicgarden.com/why-are-my-plants-not-producing-fruit/
Was this helpful?
I’m Barrie L., a passionate hydroponic gardening enthusiast dedicated to cultivating thriving, soil-less gardens. With a focus on all things hydroponic, I share my expertise on innovative growing techniques and sustainable practices through my blog, tophydroponicgarden.com. As a seasoned hydroponics specialist, my goal is to inspire and guide fellow gardeners in harnessing the power of water-based cultivation for bountiful and eco-friendly harvests. I’m also an author of the book “Hydroponics For Absolute Beginners: Your Step By Step Guide For How To Create An Hydroponics System At Home Without Soil, For Growing Vegetable, Fruit And Herbs.” which is sold on Amazon. Join me on a journey of redefining the way we cultivate plants, one nutrient-rich solution at a time. Happy growing!